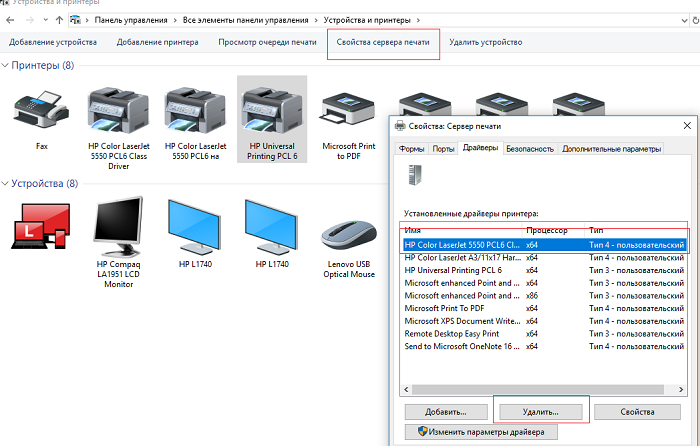
Installing a printer driver from the list of installed drivers
To install a printer driver, open the devices menu on your computer. On Windows 10 or 11, go to Settings, then select Devices and Printers & scanners. Click Add a printer or scanner so the system can start searching for available devices.
After the printer is detected, select it from the list. If the driver is not installed automatically, choose the option Install driver manually. At this stage, a list of manufacturers and models may appear. Select your model and follow the on-screen instructions. Make sure your printer is connected to the network or directly to the computer via a USB cable.
If the driver is not available in the list, visit the manufacturer’s website. Usually, there you can find the latest driver versions for download. After downloading the file, follow the installer instructions. Then return to the Printers & scanners menu and confirm that your printer is shown as ready to use.
Preparation for installation: checking printer and system compatibility
Make sure your printer is compatible with your operating system. First, check the minimum requirements listed in the printer documentation. Compare them with your computer or laptop specifications. Operating systems often have different versions and updates, so it is important to use up-to-date information.
Then visit the printer manufacturer’s website. There you will find drivers and additional resources, including compatibility lists. Download the required drivers for your OS version to avoid installation issues.
Do not forget to check support for 32-bit and 64-bit systems if you are using a modern OS version. This is often the cause of incompatibility. If your printer supports cloud technologies, make sure you have a stable internet connection to receive the latest updates.
It is also recommended to read user reviews about your printer’s compatibility with the selected system. This will help avoid unexpected issues during installation.
By completing these steps, you will significantly simplify the printer driver installation process and increase the chances of successful device operation.
Searching for the printer in the Windows device list
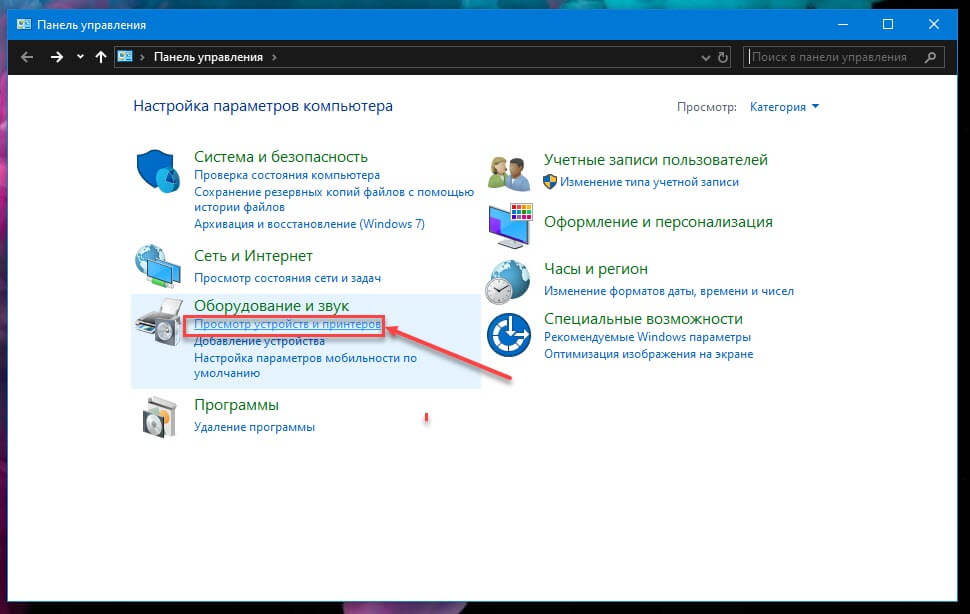
Open Control Panel and select Devices and Printers. This will give you access to all connected devices.
At the top of the window, find the Add a printer button. The system will start searching for available printers on your network or connected to the computer.
Make sure the printer is turned on and connected to the same Wi-Fi network. If the device does not appear, check cable connections and restart the printer.
If your printer still does not appear, click The printer that I want isn’t listed in the Devices and Printers section. The system will offer alternative search options.
For a network printer, choose Select a shared printer by name and enter its network address. For USB printers, simply connect it and the system will detect the device automatically.
Once the printer is found, follow the instructions to complete driver installation. Finish the process and test printing to ensure the device works correctly.
Choosing the correct driver from available options
Identify the printer model and specify the manufacturer for an accurate driver search. This minimizes the risk of installing incompatible software.
Review the list of drivers on the manufacturer’s website. Pay attention to the driver type: universal versions may support multiple models, while dedicated drivers provide better performance.
Check the release date of the driver. Newer versions usually include bug fixes and compatibility improvements. If possible, choose drivers released after your operating system version.
Pay attention to user reviews. Forums and communities can provide useful information about issues that may occur with specific driver versions.
Do not forget about platform compatibility. Make sure the selected driver is compatible with your operating system (Windows, macOS, Linux, etc.). If in doubt, check the system requirements section on the manufacturer’s website.
Follow installation instructions carefully. Some drivers require additional configuration or supporting software.
If issues occur after installation, try removing the driver and installing another version. Sometimes older versions work better on certain systems.
By following these recommendations, you can choose the most suitable driver for your printer and ensure stable operation.
Driver installation process: step-by-step guide
Open Control Panel on your computer. Select “Devices and Printers”.
Click “Add a printer”. The system will start searching for available devices. If your printer is already connected, it should appear in the list. Select it and click “Next”.
If the printer does not appear, choose “The printer that I want isn’t listed”. Then select “Add a printer using a TCP/IP address or hostname” or “Add a network, wireless or Bluetooth printer”, depending on your connection type.
Enter the connection details. If required, specify the IP address of your device. After successful detection, select the connection type and click “Next”.
The next step is driver installation. Choose “Install the printer driver”. If the driver is already downloaded, select it from the list. Otherwise, download it from the official printer manufacturer’s website. Make sure the driver version matches your operating system.
After downloading, return to the installation window and select the driver. Complete the installation by following the on-screen instructions.
After installation, perform a test print. Right-click the printer icon in “Devices and Printers” and select “Print test page”. This will confirm that the device works correctly.
If problems occur, check the printer connection and repeat the installation process. Make sure you are using the correct driver version and that the printer is powered on.
Configuring printer settings after driver installation
After installing the printer driver, it is important to configure its settings properly for optimal print quality and convenience.
1. Open the “Settings” menu on your computer. Go to “Devices” or “Printers & scanners”.
2. Find your printer in the list of installed devices. Select it and click “Manage”.
3. Configure basic settings:
- Paper size: Make sure the correct paper format is selected (A4, Letter, etc.).
- Print quality: Choose normal, high quality, or draft mode. High quality is best for documents with images.
- Color or black & white mode: Set the mode depending on your needs.
4. Go to advanced settings to optimize performance:
- Double-sided printing: Enable this option if supported to save paper.
- Network settings: Ensure the printer is connected to Wi-Fi if it is wireless.
5. Print a test page:
Test your settings by printing a test page to check quality and configuration.
6. Save changes and close settings. Your printer is now ready to use.
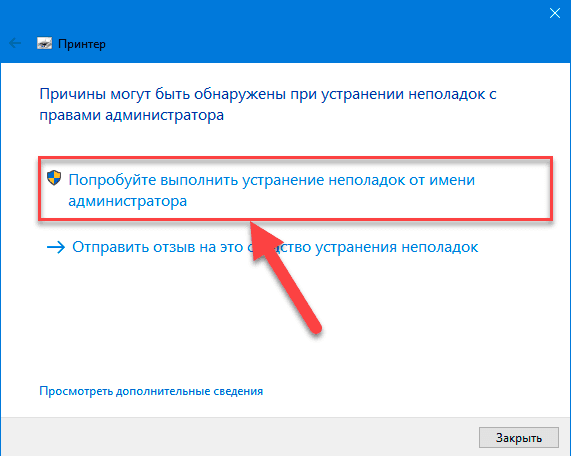
Testing and troubleshooting printer connection issues
Check the cable connection between the printer and computer. Make sure the USB or network cable is properly connected and not damaged. If using Wi-Fi, check the printer’s network connection.
Open Control Panel and go to “Devices and Printers”. Make sure your printer appears in the list and shows the status “Ready”. If it shows “Unknown” or “Unrecognized”, follow these steps.
| Step | Action |
|---|---|
| 1 | Remove the printer from the device list and add it again. |
| 2 | Update the printer driver. Visit the manufacturer’s website for the latest version. |
| 3 | Check for operating system updates and install them. |
| 4 | Restart your computer and try connecting the printer again. |
If the issue persists, test the printer by printing a test page. If it does not print, check ink levels and paper supply.
Pay attention to error messages. Record them and search the manufacturer’s support website for specific solutions.
If you are using a Wi-Fi printer, check signal strength. Try moving the router closer or connecting via Ethernet cable for testing.
Follow these steps to diagnose and fix issues. This will help restore normal printer operation and avoid long downtime.